

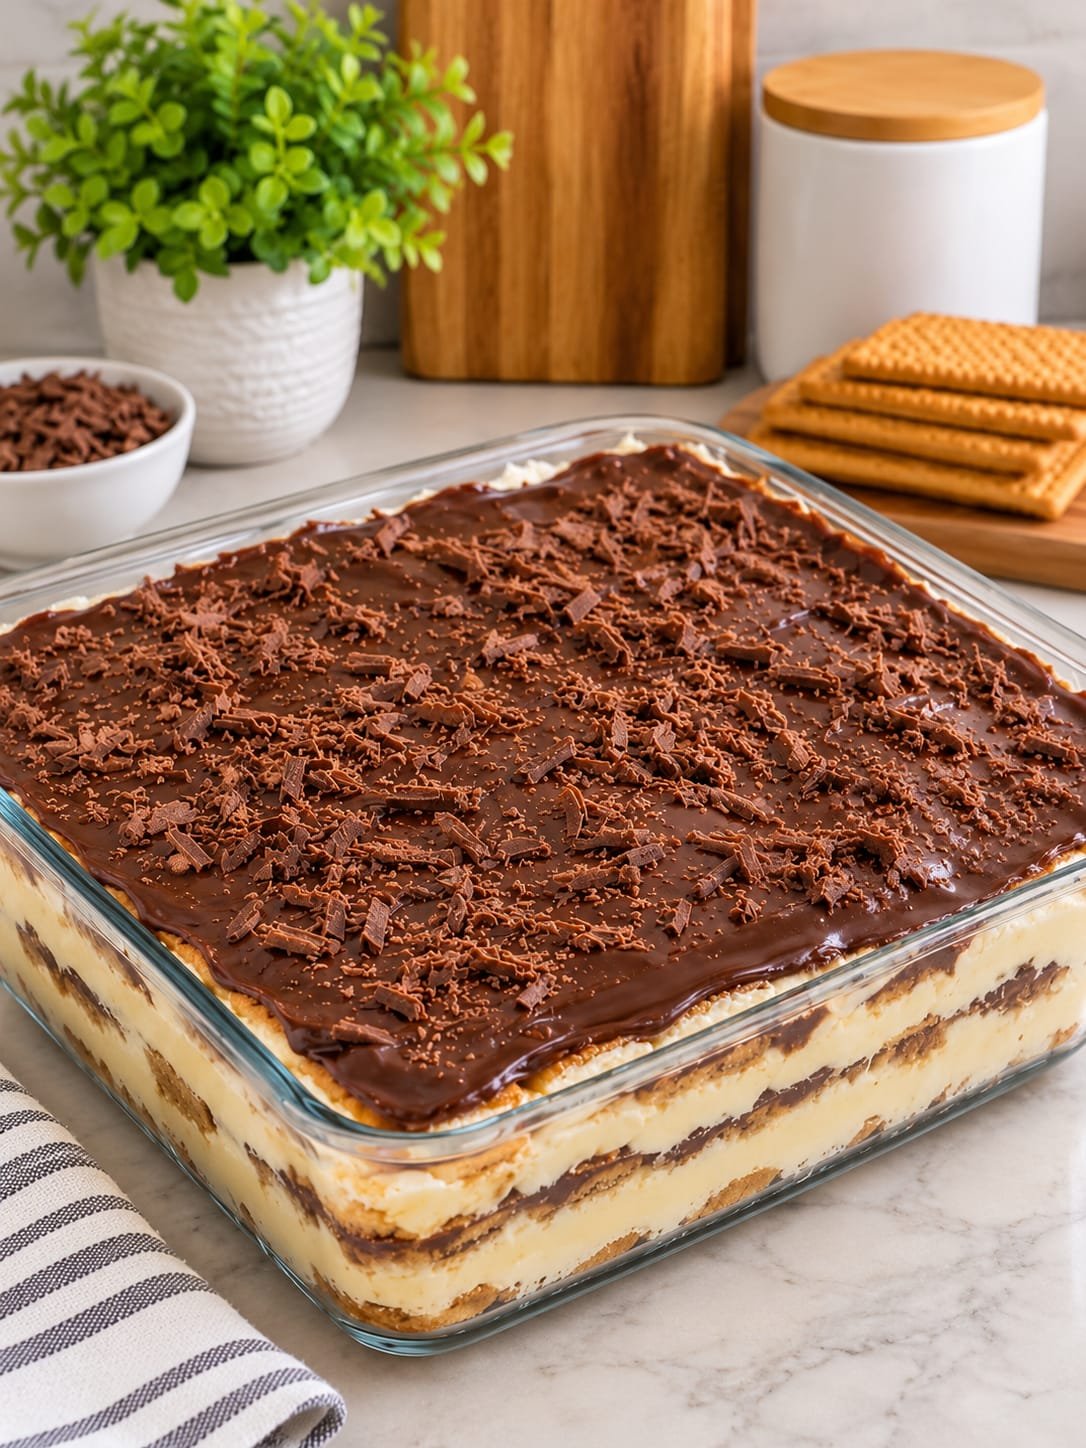
If you’re craving a rich chocolate dessert but don’t feel like turning on the oven, this No-Bake Chocolate Biscuit Cream Cake is just what you need! Made with layers of crunchy biscuits, smooth chocolate cream, and a silky chocolate topping, this easy dessert is perfect for satisfying your sweet tooth with very little effort.
One of the best things about this cake is how simple it is to prepare. There’s no baking, no complicated techniques, and no fancy equipment required. Just layer the biscuits with a delicious homemade cream filling, cover everything with glossy chocolate ganache, and let the refrigerator do the rest.
After chilling, the biscuits soften into tender, cake-like layers while the creamy filling becomes rich and luscious. Every slice delivers the perfect combination of chocolate, cream, and delicate biscuit layers.
Whether you’re making dessert for your family, preparing something special for guests, or looking for an easy treat to share, this no-bake chocolate cake is always a wonderful choice.
Why You’ll Love This No-Bake Chocolate Biscuit Cake
- No oven required: Perfect for warm days or when you want a simple dessert without baking.
- Easy ingredients: Made with everyday ingredients you can find at most grocery stores.
- Rich chocolate flavor: Chocolate cream and smooth ganache make every bite delicious.
- Beautiful layers: The creamy filling and softened biscuits create an impressive sliced cake.
- Make-ahead friendly: Prepare it in advance and let it chill until you’re ready to serve.
Ingredients You’ll Need
For the biscuit layers:
- 300 g plain tea biscuits or digestive biscuits
- 1/2 cup (120 ml) milk, for dipping the biscuits
For the chocolate cream filling:
- 2 cups (480 ml) whole milk
- 1/2 cup (100 g) granulated sugar
- 1/4 cup (25 g) unsweetened cocoa powder
- 3 tablespoons (24 g) cornstarch
- 100 g semi-sweet chocolate, chopped
- 1 teaspoon vanilla extract
- 2 tablespoons (28 g) unsalted butter
For the chocolate ganache:
- 150 g semi-sweet chocolate, chopped
- 1/2 cup (120 ml) heavy cream
- 1 teaspoon butter, optional, for extra shine
Optional toppings:
- Chocolate shavings
- Crushed biscuits
- Chocolate curls
- A light dusting of cocoa powder
How to Make No-Bake Chocolate Biscuit Cream Cake
Step 1: Prepare the Chocolate Cream
In a medium saucepan, whisk together the sugar, cocoa powder, and cornstarch until evenly combined. Gradually pour in the milk, whisking continuously to prevent lumps from forming.
Place the saucepan over medium heat and cook, stirring constantly, until the mixture thickens into a smooth pudding-like cream. This usually takes about 5–8 minutes.
Remove the saucepan from the heat. Add the chopped chocolate, butter, and vanilla extract. Stir until the chocolate melts completely and the filling becomes glossy and smooth.
Let the cream cool for a few minutes, stirring occasionally. Keep it slightly warm and spreadable rather than allowing it to become completely firm.
Step 2: Prepare the Biscuits
Pour the milk for dipping into a shallow bowl. Quickly dip each biscuit into the milk, just long enough to moisten it slightly.
Avoid soaking the biscuits for too long. They should soften during refrigeration without becoming mushy.
Step 3: Assemble the Cake
Choose a square or rectangular dish measuring approximately 8 x 8 inches or a similar size.
Arrange a layer of dipped biscuits across the bottom of the dish, breaking a few if necessary to fill any gaps.
Spread a generous layer of chocolate cream over the biscuits, smoothing it gently with a spatula.
Add another layer of dipped biscuits, followed by more chocolate cream. Continue layering until you’ve used all the biscuits and filling, finishing with a layer of chocolate cream on top.
Step 4: Make the Chocolate Ganache
Place the chopped chocolate in a heatproof bowl. Heat the heavy cream in a small saucepan until steaming and just beginning to simmer around the edges. Do not let it boil vigorously.
Pour the hot cream over the chocolate and let it stand for 2 minutes. Stir gently from the center outward until the mixture becomes smooth and glossy.
If desired, stir in the butter for an extra-shiny finish.
Step 5: Add the Chocolate Topping
Pour the ganache over the assembled cake, spreading it evenly to cover the top.
For a pretty finish, sprinkle chocolate shavings, crushed biscuits, or chocolate curls over the ganache while it is still slightly soft.
Step 6: Chill Until Set
Cover the dish and refrigerate the cake for at least 6 hours, preferably overnight.
This chilling time allows the biscuits to soften, the cream to firm up, and all the flavors to come together. For the neatest slices, make sure the cake is thoroughly chilled before cutting.
Step 7: Slice and Serve
Remove the cake from the refrigerator and cut it into squares using a sharp knife. For cleaner slices, wipe the knife between cuts.
Serve chilled and enjoy the beautiful layers of tender biscuits, rich chocolate cream, and silky ganache. Every bite tastes like a creamy chocolate dream!
Tips for the Best Chocolate Biscuit Cream Cake
- Don’t oversoak the biscuits: A quick dip in milk is enough to help them soften as the cake chills.
- Whisk the filling constantly: This helps prevent lumps and keeps the chocolate cream smooth.
- Use good-quality chocolate: The flavor of the chocolate makes a big difference in the finished dessert.
- Let the filling cool slightly: Very hot filling can make the biscuits excessively soft.
- Chill overnight when possible: The longer resting time gives the layers a lovely cake-like texture.
- Cut with a warm knife: Dip a sharp knife in warm water, wipe it dry, and slice for cleaner edges.
Delicious Variations
Chocolate and vanilla layers: Replace half of the chocolate filling with vanilla pudding cream for a beautiful two-tone dessert.
Mocha chocolate cake: Add 1 teaspoon of instant espresso powder to the warm chocolate filling to enhance its chocolate flavor.
Chocolate hazelnut version: Spread a thin layer of chocolate hazelnut spread between some of the biscuit layers.
Coconut chocolate cake: Sprinkle shredded coconut between the layers or over the ganache for a tropical twist.
Extra-crunchy topping: Add chopped toasted hazelnuts, almonds, or crushed chocolate cookies just before serving.
How to Store No-Bake Chocolate Biscuit Cream Cake
Keep the cake covered in the refrigerator for up to 4 days. Store it in an airtight container or cover the dish tightly to prevent it from absorbing other refrigerator odors.
This cake is an excellent make-ahead dessert because the biscuit layers become softer and more cake-like as they rest.
Freezing is also possible. Cut the fully chilled cake into portions, wrap them well, and freeze in a freezer-safe container for up to 2 months for best quality. Thaw overnight in the refrigerator before serving. The texture of the cream may change slightly after freezing.
Frequently Asked Questions
Can I make this chocolate biscuit cake the day before?
Absolutely! In fact, making it the day before is one of the best ways to get a lovely texture. The biscuits have enough time to soften, and the cream becomes firm enough for neat slices.
Which biscuits work best for this recipe?
Plain tea biscuits, digestive biscuits, and graham crackers are all good choices. Choose sturdy biscuits that can absorb a little milk without falling apart immediately.
Can I use store-bought chocolate pudding?
Yes. You can substitute thick chocolate pudding for the homemade filling if you’re short on time. Make sure it is thick enough to hold the layers together once chilled.
Why is my chocolate cream too runny?
The cream may need more cooking time or more time to chill. When preparing the filling, cook it until noticeably thick, stirring continuously. Allow the assembled cake to chill for at least 6 hours before slicing.
Can I make this cake without heavy cream?
Yes. For the topping, you can use a chocolate glaze made with melted chocolate and a little butter, although it will have a different texture from traditional ganache. The filling itself uses milk and doesn’t require heavy cream.
How long does the cake need to chill?
Allow at least 6 hours in the refrigerator, although overnight chilling usually produces the best texture and cleanest slices.
Can I make individual portions instead of one large cake?
Definitely! Layer the biscuits and chocolate cream in small dessert glasses or jars. Add the ganache on top and refrigerate until set. Individual portions are lovely for parties and family gatherings.
Can I use white chocolate instead of semi-sweet chocolate?
You can experiment with white chocolate, but it is much sweeter and behaves differently when melted. For the best results, use a tested white chocolate ganache ratio and reduce the sugar in the filling if you replace the chocolate there.
No-Bake Chocolate Biscuit Cream Cake
Prep Time: 25 minutes
Chill Time: 6 hours
Total Time: 6 hours 25 minutes
Servings: 9 servings
Course: Dessert
Method: No-Bake
Ingredients
For the biscuit layers:
- 300 g plain tea biscuits or digestive biscuits
- 1/2 cup (120 ml) milk, for dipping
For the chocolate cream:
- 2 cups (480 ml) whole milk
- 1/2 cup (100 g) granulated sugar
- 1/4 cup (25 g) unsweetened cocoa powder
- 3 tablespoons (24 g) cornstarch
- 100 g semi-sweet chocolate, chopped
- 1 teaspoon vanilla extract
- 2 tablespoons (28 g) unsalted butter
For the ganache:
- 150 g semi-sweet chocolate, chopped
- 1/2 cup (120 ml) heavy cream
- 1 teaspoon butter, optional
Instructions
- Whisk the sugar, cocoa powder, and cornstarch in a saucepan. Gradually whisk in the milk until smooth.
- Cook over medium heat, stirring constantly, for 5–8 minutes until thickened.
- Remove from the heat. Stir in the chopped chocolate, butter, and vanilla until smooth. Cool slightly.
- Quickly dip each biscuit into the milk and arrange a layer in an 8 x 8-inch dish.
- Spread chocolate cream over the biscuits. Repeat the biscuit and cream layers, finishing with chocolate cream.
- Place the chopped chocolate for the ganache in a heatproof bowl. Pour over the hot heavy cream and let stand for 2 minutes.
- Stir until smooth and glossy. Add the optional butter, then spread the ganache over the cake.
- Decorate with chocolate shavings or crushed biscuits if desired.
- Cover and refrigerate for at least 6 hours, preferably overnight.
- Slice into squares and serve chilled.
Notes
- Dip biscuits briefly to prevent them from becoming soggy.
- Allow the cake to chill completely before slicing.
- Keep refrigerated and consume within 4 days.
- Use a slightly larger dish if your biscuits are thick or your layers need more room.
This No-Bake Chocolate Biscuit Cream Cake is proof that a simple dessert can still feel special. With its soft biscuit layers, smooth chocolate filling, and glossy ganache topping, it’s an easy treat worth sharing. Make it ahead, keep it chilled, and enjoy a slice whenever you’re in the mood for something rich, creamy, and wonderfully chocolatey!