

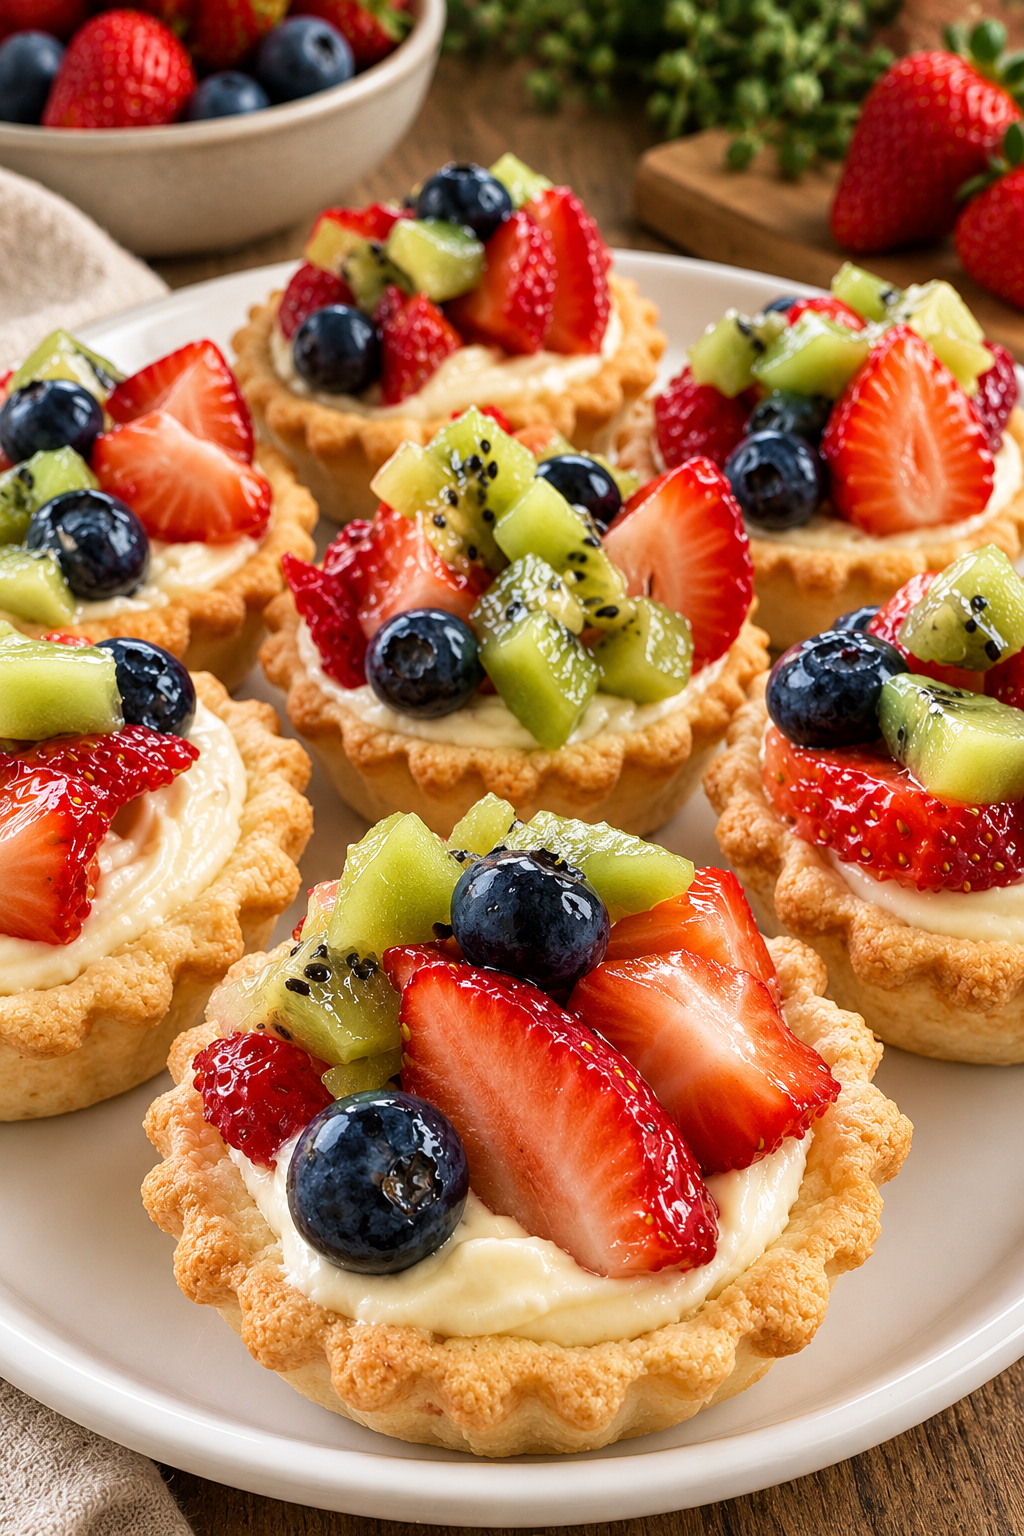
These Mini Vanilla Fruit Tart Cookie Cups are such a pretty little dessert and surprisingly easy to make. Buttery vanilla cookie cups are baked until lightly golden, filled with a smooth and creamy vanilla filling, and topped with colorful fresh fruit.
They have the best combination of textures: a crisp-tender cookie shell, creamy vanilla filling, and juicy berries and fruit on top. They’re perfect for spring and summer gatherings, baby showers, brunches, birthdays, holidays, or anytime you want an elegant bite-sized dessert.
Why You’ll Love These Mini Fruit Tart Cookie Cups
- Easy individual desserts with no complicated tart crust.
- Soft, buttery vanilla cookie cups with crisp golden edges.
- Rich and creamy vanilla filling.
- Fresh fruit makes them colorful and refreshing.
- Perfect for parties, showers, and dessert tables.
- Easy to customize with your favorite seasonal fruit.
Ingredients You’ll Need
For the Vanilla Cookie Cups
- 1/2 cup unsalted butter, softened
- 1/2 cup granulated sugar
- 1 large egg
- 1 teaspoon vanilla extract
- 1 1/2 cups all-purpose flour
- 1/2 teaspoon baking powder
- 1/4 teaspoon salt
For the Vanilla Cream Filling
- 4 ounces cream cheese, softened
- 1/2 cup powdered sugar
- 1 teaspoon vanilla extract
- 1/2 cup heavy whipping cream, cold
For the Fruit Topping
- 1/2 cup fresh strawberries, finely diced
- 1/2 cup fresh blueberries
- 1/2 cup fresh raspberries
- 1/2 cup blackberries or diced kiwi, optional
- 1 tablespoon apricot jam, optional, for glazing
How to Make Mini Vanilla Fruit Tart Cookie Cups
1. Prepare the Cookie Dough
Preheat your oven to 350°F (175°C). Lightly grease a 24-cup mini muffin pan.
In a large bowl, beat the softened butter and granulated sugar until light and creamy. Add the egg and vanilla extract and mix until smooth.
In a separate bowl, whisk together the flour, baking powder, and salt. Gradually add the dry ingredients to the butter mixture, mixing just until a soft cookie dough forms.
2. Form the Cookie Cups
Divide the dough into 24 small portions and roll each portion into a ball. Place one ball into each mini muffin cup.
Using your thumb or the back of a small rounded measuring spoon, gently press the dough down and up the sides of each cup to create a small cavity in the center.
3. Bake
Bake for 10–12 minutes, or until the edges are lightly golden.
The centers may puff slightly while baking. As soon as the cookies come out of the oven, gently press the center down again with the back of a teaspoon if necessary.
Let the cookie cups cool in the pan for about 5 minutes, then carefully transfer them to a wire rack to cool completely.
4. Make the Vanilla Cream Filling
Beat the softened cream cheese, powdered sugar, and vanilla extract until smooth and creamy.
In a separate bowl, whip the cold heavy cream until stiff peaks form. Gently fold the whipped cream into the cream cheese mixture until light and fluffy.
5. Fill the Cookie Cups
Once the cookie cups are completely cool, spoon or pipe the vanilla cream filling into the center of each one.
Don’t fill them all the way to the top because you’ll need room for the fresh fruit.
6. Add the Fresh Fruit
Arrange small pieces of strawberries, blueberries, raspberries, and your favorite fruit over the vanilla filling.
For a beautiful presentation, use a mixture of colors and place the fruit in small, neat portions rather than piling too much into each cup.
7. Add a Simple Glaze
For a glossy bakery-style finish, warm the apricot jam with a teaspoon of water until smooth. Let it cool slightly, then lightly brush it over the fruit.
This step is optional, but it helps the fruit look shiny and keeps it looking fresh.
Tips for the Best Cookie Cups
- Don’t overbake: The cookie cups should be lightly golden around the edges but still tender.
- Press the centers while warm: This creates a deeper cavity for the vanilla filling.
- Cool completely before filling: Warm cookie cups can soften the cream filling.
- Use cold heavy cream: Cold cream whips faster and holds its shape better.
- Cut fruit into small pieces: Smaller pieces fit neatly into the little cups.
- Add fruit shortly before serving: This keeps the cookie shells from becoming soggy.
Fruit Ideas for Mini Tart Cups
You can use almost any fresh fruit you love. Strawberries, blueberries, raspberries, blackberries, kiwi, peaches, mango, and grapes all work beautifully.
For a colorful party platter, try combining strawberries, blueberries, kiwi, and raspberries. For a tropical version, use mango, pineapple, kiwi, and toasted coconut.
Frequently Asked Questions
Can I make these cookie cups ahead of time?
Yes. The baked cookie cups can be made up to 2 days ahead and stored in an airtight container at room temperature. Prepare the filling and fruit closer to serving time for the freshest texture.
Can I use store-bought sugar cookie dough?
Absolutely. Refrigerated sugar cookie dough can be used as a shortcut. Divide it into small portions and press it into the mini muffin pan before baking according to the package directions.
How do I keep the cookie cups from sticking?
Lightly grease the mini muffin pan before adding the dough. Let the cookie cups cool for several minutes before removing them, as they become easier to handle once slightly cooled.
Can I use whipped topping instead of heavy cream?
Yes. You can substitute prepared whipped topping for the homemade whipped cream if you want a quicker filling. The flavor will be slightly different, but the cookie cups will still be delicious.
How should I store fruit tart cookie cups?
Once filled and topped with fruit, store them in an airtight container in the refrigerator and enjoy them within 1–2 days. For the best texture, keep the cookie cups unfilled until close to serving time when possible.
Can I freeze the cookie cups?
The baked cookie cups can be frozen without the filling or fruit for up to 2 months. Thaw them at room temperature, then fill and decorate before serving.
Mini Vanilla Fruit Tart Cookie Cups Recipe Card
Mini Vanilla Fruit Tart Cookie Cups
<p>
  <strong>Prep Time:</strong> 25 minutes<br>
  <strong>Cook Time:</strong> 10–12 minutes<br>
  <strong>Total Time:</strong> 35–40 minutes<br>
  <strong>Servings:</strong> 24 mini cookie cups
</p>

<h4>Ingredients</h4>

<p><strong>For the Cookie Cups:</strong></p>
<ul>
  <li>1/2 cup unsalted butter, softened</li>
  <li>1/2 cup granulated sugar</li>
  <li>1 large egg</li>
  <li>1 teaspoon vanilla extract</li>
  <li>1 1/2 cups all-purpose flour</li>
  <li>1/2 teaspoon baking powder</li>
  <li>1/4 teaspoon salt</li>
</ul>

<p><strong>For the Vanilla Filling:</strong></p>
<ul>
  <li>4 ounces cream cheese, softened</li>
  <li>1/2 cup powdered sugar</li>
  <li>1 teaspoon vanilla extract</li>
  <li>1/2 cup heavy whipping cream, cold</li>
</ul>

<p><strong>For the Fruit:</strong></p>
<ul>
  <li>1/2 cup diced strawberries</li>
  <li>1/2 cup blueberries</li>
  <li>1/2 cup raspberries</li>
  <li>1/2 cup blackberries or diced kiwi, optional</li>
  <li>1 tablespoon apricot jam, optional</li>
</ul>

<h4>Instructions</h4>

<ol>
  <li>Preheat the oven to 350°F (175°C) and lightly grease a 24-cup mini muffin pan.</li>
  <li>Beat softened butter and sugar until creamy. Mix in the egg and vanilla.</li>
  <li>Whisk flour, baking powder, and salt together. Gradually mix into the wet ingredients until a soft dough forms.</li>
  <li>Divide the dough into 24 portions and roll into balls. Place in the mini muffin pan.</li>
  <li>Press the dough into the bottom and slightly up the sides of each cup.</li>
  <li>Bake for 10–12 minutes, until lightly golden around the edges.</li>
  <li>While warm, gently press down the centers if they have puffed up. Cool completely.</li>
  <li>Beat cream cheese, powdered sugar, and vanilla until smooth.</li>
  <li>Whip the cold heavy cream to stiff peaks and gently fold it into the cream cheese mixture.</li>
  <li>Pipe or spoon the vanilla filling into each cooled cookie cup.</li>
  <li>Top with fresh strawberries, blueberries, raspberries, and other fruit.</li>
  <li>For a glossy finish, lightly brush the fruit with warmed apricot jam.</li>
  <li>Chill until ready to serve.</li>
</ol>

<p><strong>Recipe Notes:</strong> For the prettiest and freshest results, fill and decorate the cookie cups shortly before serving. Keep finished tart cups refrigerated.</p>