

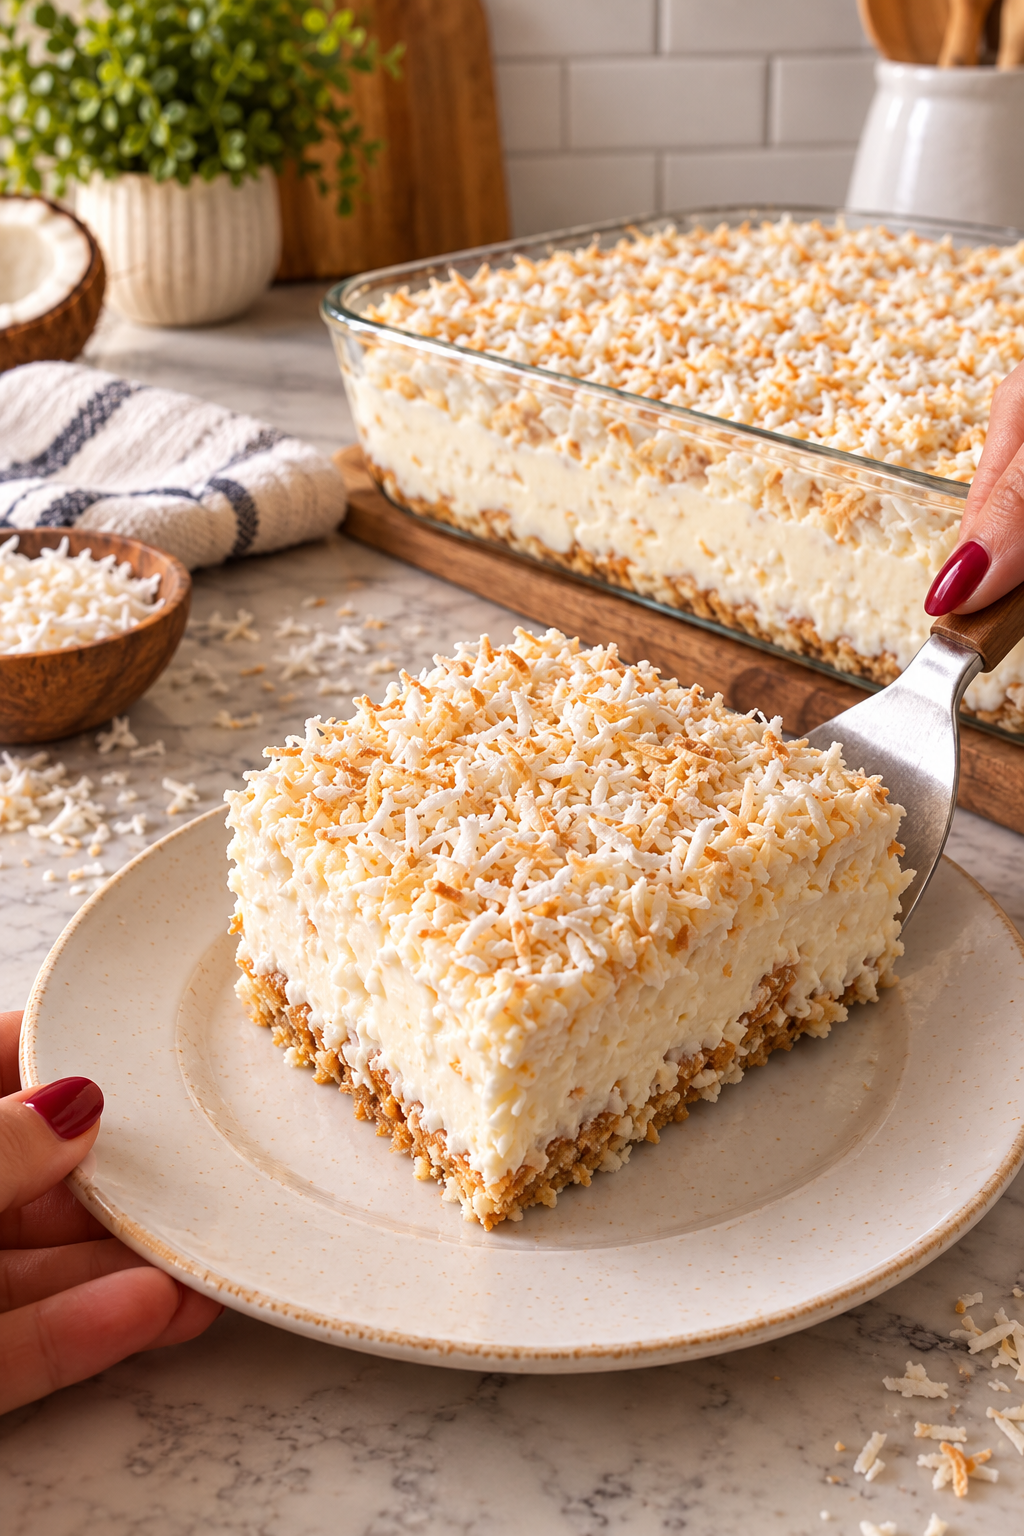
There is something so comforting about a chilled coconut dessert with a buttery cookie crust and a thick, creamy layer piled high with sweet shredded coconut. These no-bake coconut cream dessert bars are wonderfully simple, but they look like the kind of dessert you would bring to a special gathering.
The bottom has a lightly crunchy, buttery texture, while the creamy coconut layer is smooth, rich, and softly sweet. A generous blanket of shredded coconut on top gives every bite a little extra texture and plenty of tropical flavor. Best of all, the whole dessert comes together without turning on the oven.
Flavor & Texture Highlights
The flavor is sweet and creamy with plenty of coconut throughout. A buttery vanilla cookie crust balances the soft filling, while the coconut topping adds a pleasant chewy texture.
After chilling, the creamy layer becomes firm enough to slice neatly but remains soft and silky when you take a bite. It is the kind of refrigerator dessert that tastes even better when served cold.
Jump to Section
- Why You’ll Love This Recipe
- What You’ll Need to Make This Recipe
- How to Make No-Bake Coconut Cream Dessert Bars
- Expert Tips
- How to Store It
- What to Serve With
- Frequently Asked Questions
- Recipe
Why You’ll Love This Recipe
- No oven required: Everything is assembled and chilled, making this an easy dessert for warm days.
- Ultra creamy: The coconut filling has a smooth, rich texture that melts in your mouth.
- Lots of coconut flavor: Coconut milk, coconut, and a generous topping make the flavor shine.
- Easy to make ahead: It actually benefits from several hours in the refrigerator.
- Beautiful presentation: The bright white coconut topping makes every slice look elegant and inviting.
What You’ll Need to Make This Recipe
Vanilla wafer cookies make a simple buttery crust with a gentle vanilla flavor. Graham crackers can also be used if that’s what you have in the pantry.
Unsalted butter binds the cookie crumbs together and gives the crust a rich, buttery finish.
Coconut milk brings the main coconut flavor to the creamy filling. Use full-fat canned coconut milk for the richest texture.
Sweetened condensed milk adds sweetness and helps create that thick, luxurious consistency that makes chilled coconut desserts so irresistible.
Cream cheese gives the filling enough body to slice while adding a subtle tang that keeps the dessert from tasting overly sweet.
Whipped cream lightens the filling and gives it that soft, fluffy texture.
Shredded coconut is used throughout the dessert and generously scattered over the top for a beautiful finish and extra coconut flavor.
The exact measurements are in the recipe card below.
How to Make No-Bake Coconut Cream Dessert Bars Step by Step
Step 1: Prepare the Pan
Line an 8×8-inch baking pan with parchment paper, leaving a little overhang on two sides. This will make it much easier to lift the chilled dessert out of the pan before slicing.
Step 2: Make the Cookie Crust
Place the vanilla wafer cookies in a food processor and pulse until they become fine crumbs. Add the melted butter and pulse again until the mixture resembles damp sand and holds together when pressed.
Step 3: Press the Crust Into the Pan
Transfer the crumb mixture to the prepared pan and press it firmly into an even layer. Use the bottom of a measuring cup or glass to compact the crust. Place it in the refrigerator while you prepare the filling.
Step 4: Prepare the Coconut Filling
In a large bowl, beat the softened cream cheese until smooth and creamy. Add the sweetened condensed milk, coconut milk, vanilla extract, and coconut extract if using. Beat until completely smooth and well combined.
Step 5: Fold in the Whipped Cream
Whip the heavy cream in a separate bowl until stiff peaks form. Gently fold the whipped cream into the coconut mixture in two or three additions. Take your time here so you don’t deflate the whipped cream. The finished filling should be thick, smooth, and fluffy.
Step 6: Add the Coconut
Fold in the shredded coconut until it is evenly distributed throughout the filling. If you prefer a very smooth cream layer, you can reduce the amount of coconut mixed into the filling and save more for the topping.
Step 7: Spread the Filling Over the Crust
Remove the crust from the refrigerator and spoon the coconut filling over it. Spread the top with an offset spatula or the back of a spoon, creating an even layer from corner to corner.
Step 8: Add the Coconut Topping
Sprinkle the remaining shredded coconut generously over the entire surface. For a slightly deeper flavor, lightly toast the coconut first and let it cool completely before adding it to the dessert.
Step 9: Chill Until Firm
Cover the pan and refrigerate for at least 6 hours, preferably overnight. This resting time allows the filling to firm up and makes the dessert much easier to cut into clean squares.
Step 10: Slice and Serve
When you’re ready to serve, lift the dessert from the pan using the parchment paper. Use a sharp knife to cut it into squares, wiping the blade clean between cuts for neat slices. Serve cold.
Expert Tips
Use full-fat coconut milk. Light coconut milk contains more water and can make the filling softer. Full-fat coconut milk gives you a richer coconut flavor and creamier texture.
Don’t skip the chilling time. This dessert needs several hours to set properly. Overnight chilling gives the cleanest slices and the best texture.
Press the crust firmly. A compact crust will hold together much better when you lift and slice the chilled dessert.
Use softened cream cheese. Room-temperature cream cheese blends much more smoothly and helps prevent little lumps in the filling.
For extra coconut flavor, add 1/2 teaspoon coconut extract to the filling. A little goes a long way.
For a more elegant finish, toast some of the coconut topping until lightly golden. Let it cool completely before sprinkling it over the cream layer.
How to Store It
Keep the dessert covered and refrigerated. It will stay fresh for about 4 days, although the crust will gradually soften as it sits.
If you want to prepare it ahead, assemble the entire dessert the day before serving. Keep it chilled until you’re ready to slice it.
You can also freeze individual bars for up to 1 month. Wrap them well and thaw them in the refrigerator overnight. The texture may be slightly softer after freezing, but they will still make a delicious chilled treat.
What to Serve With
Fresh berries: Strawberries, raspberries, or blueberries add a bright, slightly tart contrast to the creamy coconut filling.
Fresh pineapple: A few small pieces of pineapple make the dessert feel especially tropical.
Hot coffee: The bitterness of coffee pairs beautifully with the sweet, creamy coconut.
Iced coffee: On a warm afternoon, serve a chilled coconut bar alongside an iced coffee for an easy dessert break.
Extra whipped cream: A small spoonful of lightly sweetened whipped cream makes each serving feel even more indulgent.
Frequently Asked Questions
Can I use graham crackers instead of vanilla wafers?
Yes. Graham crackers make an excellent substitute. The flavor will be slightly more honey-like, but the crust will still pair beautifully with the coconut filling.
Can I use Cool Whip instead of homemade whipped cream?
Yes. If you prefer a shortcut, you can substitute about 3 cups of thawed whipped topping for the homemade whipped cream. The texture will be slightly different but still creamy and delicious.
Can I make this dessert without cream cheese?
Yes, although the filling will need a different structure. For the easiest version, use a thick coconut pudding mixture folded with whipped cream. The cream cheese in this recipe provides stability as well as a subtle tang, so removing it will change the texture.
Why is my coconut filling too soft?
The most common reasons are insufficient chilling, using reduced-fat coconut milk, or not whipping the heavy cream firmly enough. Chill the dessert for at least 6 hours and use full-fat canned coconut milk for the best results.
Can I toast the coconut topping?
Absolutely. Spread the shredded coconut on a baking sheet and toast it at 325°F for about 5 to 8 minutes, stirring once or twice, until lightly golden. Watch it closely because coconut can brown quickly.
Can I make this in a larger pan?
Yes. A 9×13-inch pan will make thinner bars. For the thick, generous layers shown here, an 8×8-inch pan works especially well.
How long does this dessert need to chill?
Give it at least 6 hours in the refrigerator. For the firmest filling and cleanest slices, chilling overnight is even better.
No-Bake Coconut Cream Dessert Bars
Prep Time: 25 minutes
Chill Time: 6 hours
Total Time: 6 hours 25 minutes
Servings: 12 bars
Ingredients
For the Cookie Crust
- 2 cups (200 g) vanilla wafer cookie crumbs
- 6 tablespoons (85 g) unsalted butter, melted
For the Coconut Cream Filling
- 8 ounces (226 g) cream cheese, softened
- 1 can (14 ounces/396 g) sweetened condensed milk
- 1 cup (240 ml) full-fat canned coconut milk, well shaken
- 1 teaspoon vanilla extract
- 1/2 teaspoon coconut extract, optional
- 1 1/2 cups (360 ml) heavy whipping cream, cold
- 1 cup (85 g) sweetened shredded coconut
For the Topping
- 1 1/2 cups (128 g) sweetened shredded coconut
Instructions
- Line an 8×8-inch baking pan with parchment paper, leaving some overhang for easy removal.
- Combine the vanilla wafer crumbs and melted butter until the crumbs are evenly moistened.
- Press the mixture firmly into the bottom of the prepared pan. Refrigerate while preparing the filling.
- Beat the softened cream cheese in a large bowl until completely smooth.
- Add the sweetened condensed milk, coconut milk, vanilla extract, and coconut extract if using. Beat until smooth and creamy.
- In a separate bowl, beat the cold heavy cream until stiff peaks form.
- Gently fold the whipped cream into the coconut mixture in two or three additions.
- Fold in 1 cup of shredded coconut until evenly distributed.
- Spread the coconut filling evenly over the chilled cookie crust.
- Sprinkle the remaining 1 1/2 cups shredded coconut evenly over the top.
- Cover and refrigerate for at least 6 hours, preferably overnight, until firm.
- Lift the chilled dessert from the pan using the parchment paper. Cut into 12 squares with a sharp knife.
- Serve cold and keep any leftovers refrigerated.
Notes
For the richest flavor and firmest filling, use full-fat canned coconut milk. If you want a more intense coconut flavor, add the optional coconut extract. For a toasted topping, toast the shredded coconut at 325°F for 5 to 8 minutes, stirring occasionally, then cool completely before using.
Final Thoughts
This no-bake coconut cream dessert is one of those recipes that feels much more impressive than the amount of work it actually requires. The buttery cookie crust, fluffy coconut filling, and generous layer of shredded coconut come together into a cool, creamy dessert that is hard to resist.
Make it the night before you need it, let the refrigerator do the work, and you’ll have a beautiful dessert ready to slice and serve. It’s simple, creamy, coconutty, and exactly the kind of sweet treat that disappears quickly from the dessert table.
For these dessert recipes