

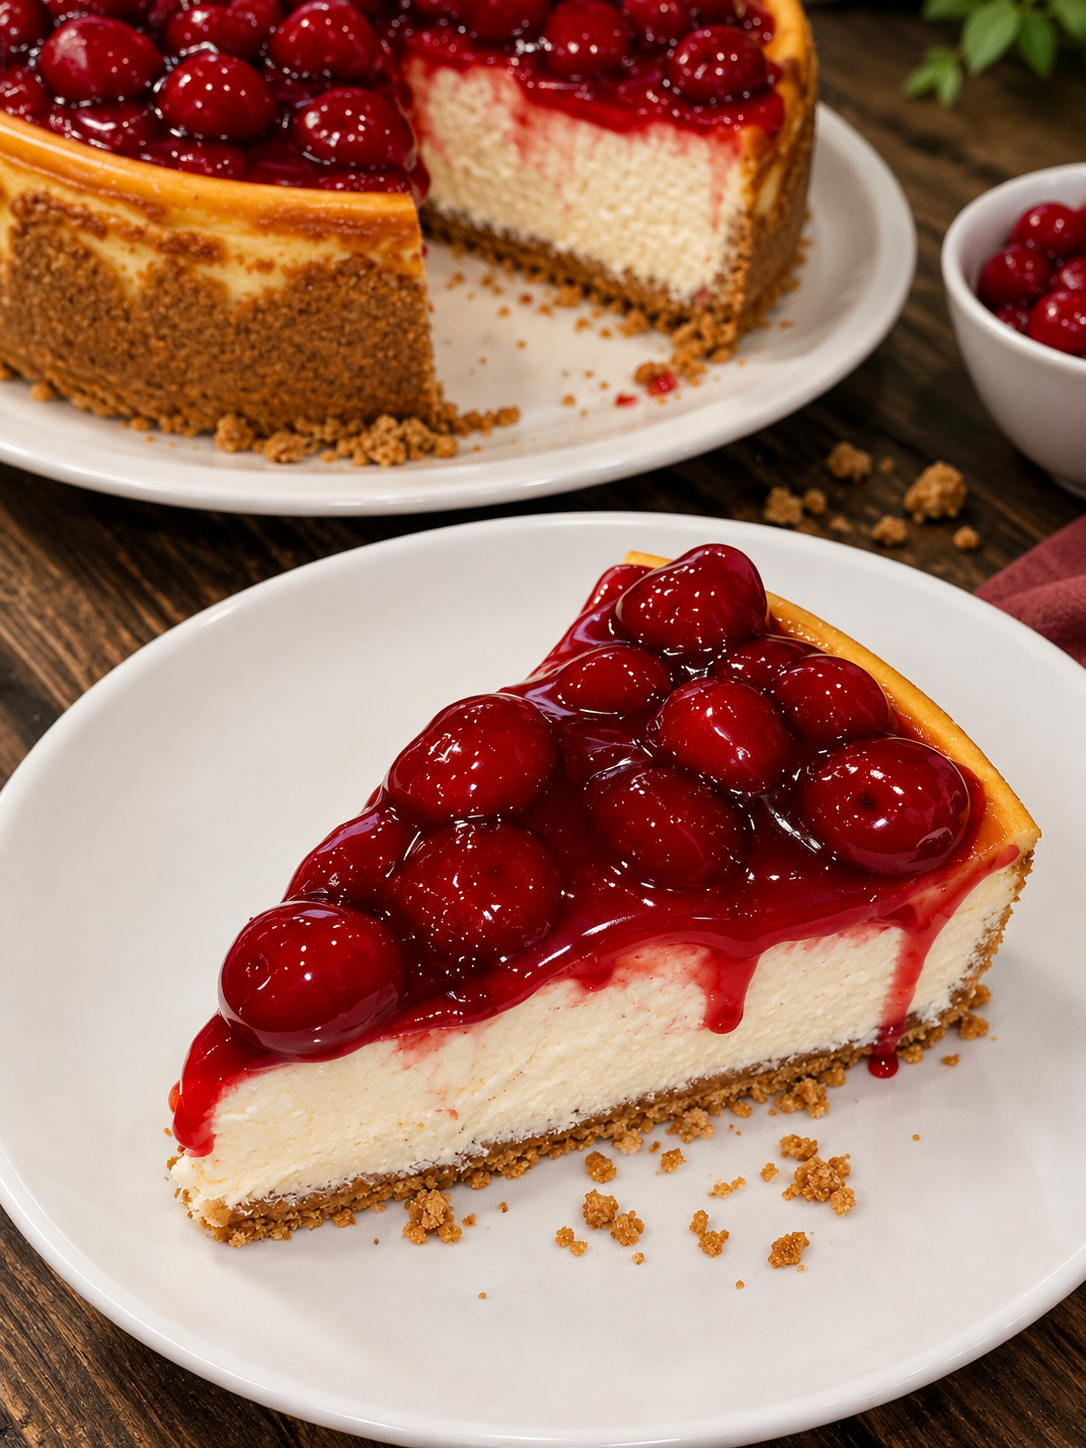
There is something wonderfully nostalgic about a classic Cherry Cheesecake. A buttery graham cracker crust, smooth and creamy cheesecake filling, and a glossy layer of sweet cherry topping come together to make one of those desserts that always feels right at home on the table.
This cheesecake is rich without being complicated, and the bright cherry topping adds just enough fruity sweetness to balance the creamy filling. It is a beautiful dessert for holidays, family dinners, birthdays, or simply whenever you are craving a slice of something special.
Flavor & Texture Highlights
The crust is buttery and lightly crisp, giving every slice a delicious contrast to the soft cheesecake filling. The center is rich, creamy, and smooth with a gentle vanilla flavor.
The cherry topping brings a glossy, fruity finish with a little tanginess that keeps the cheesecake from tasting too heavy. Each bite has the perfect combination of creamy, crunchy, and juicy textures.
Jump to Section
- Why You’ll Love This Recipe
- What You’ll Need
- How to Make It Step by Step
- Expert Tips
- How to Store and Reheat It
- What to Serve With It
- Frequently Asked Questions
- Recipe Details
Why You’ll Love This Recipe
- Classic dessert flavor: Creamy cheesecake and cherries are a timeless combination.
- Rich and creamy texture: The filling bakes into a smooth, velvety center.
- Simple ingredients: Most of the ingredients are easy to find at any grocery store.
- Beautiful presentation: The glossy cherry topping makes every slice look bakery-worthy.
- Great for special occasions: It is an easy dessert to prepare ahead for gatherings and celebrations.
What You’ll Need to Make This Recipe
Graham crackers make the classic buttery base for this cheesecake. Crush them finely so the crust holds together when sliced.
Butter binds the graham cracker crumbs together and gives the crust its rich, toasted flavor.
Cream cheese is the heart of the filling. Use full-fat cream cheese for the richest and creamiest texture, and allow it to soften before mixing.
Sugar adds sweetness without overpowering the tangy flavor of the cream cheese.
Eggs help the cheesecake set while keeping the filling smooth and tender.
Sour cream adds a subtle tang and makes the cheesecake filling especially creamy.
Vanilla extract rounds out the flavor and gives the cheesecake that familiar bakery-style aroma.
Cherry pie filling creates the beautiful ruby-red topping shown in the photo. You can use your favorite canned cherry pie filling or homemade cherry topping.
The exact measurements for all ingredients are listed in the recipe card below.
How to Make Classic Cherry Cheesecake Step by Step
Step 1: Prepare the Crust
Preheat your oven to 325°F. Lightly grease a 9-inch springform pan and line the bottom with parchment paper if desired.
Combine the graham cracker crumbs, sugar, and melted butter in a bowl. Stir until all the crumbs are evenly coated and the mixture resembles damp sand.
Step 2: Press the Crust Into the Pan
Transfer the crumb mixture to the prepared springform pan. Press it firmly and evenly across the bottom using the bottom of a measuring cup or a flat glass.
Bake the crust for about 8 to 10 minutes, then remove it from the oven and allow it to cool slightly while you prepare the filling.
Step 3: Beat the Cream Cheese
Place the softened cream cheese in a large mixing bowl. Beat it on medium speed until smooth and creamy, scraping down the sides of the bowl as needed.
Make sure there are no large lumps before adding the remaining ingredients. Room-temperature cream cheese makes this step much easier.
Step 4: Add the Sugar and Sour Cream
Add the sugar and beat until combined. Mix in the sour cream and vanilla extract until the filling is smooth and creamy.
Try not to whip the mixture excessively. A smooth batter with minimal air bubbles will give you a more even cheesecake surface.
Step 5: Add the Eggs
Add the eggs one at a time, mixing on low speed just until each egg disappears into the batter. Scrape the bowl between additions to make sure everything is evenly combined.
Once the eggs are incorporated, stop mixing. Overmixing at this stage can add too much air to the batter.
Step 6: Fill the Cheesecake
Pour the cheesecake filling over the cooled graham cracker crust. Gently smooth the top with a spatula.
Tap the pan lightly on the counter once or twice to encourage any large air bubbles to rise to the surface.
Step 7: Bake the Cheesecake
Bake the cheesecake at 325°F for approximately 55 to 70 minutes. The edges should look set while the center should still have a gentle wobble when the pan is carefully moved.
Do not wait until the center is completely firm. The cheesecake will continue to set as it cools.
Step 8: Cool Completely
Turn off the oven and leave the cheesecake inside with the oven door slightly open for about 30 minutes. This gradual cooling can help reduce the chance of the cheesecake cracking.
Remove the cheesecake from the oven and allow it to cool to room temperature. Then refrigerate it for at least 4 hours, preferably overnight.
Step 9: Add the Cherry Topping
Once the cheesecake is completely chilled, carefully remove the sides of the springform pan. Spoon the cherry pie filling over the top, spreading it gently toward the edges.
Let some of the cherry sauce naturally drip slightly down the sides for the same beautiful presentation shown in the photo.
Step 10: Slice and Serve
Use a sharp knife to cut the cheesecake into slices. For especially clean cuts, dip the knife in warm water, wipe it dry, and slice through the cheesecake.
Serve each slice chilled with plenty of cherries and their glossy sauce on top.
Expert Tips
- Use room-temperature cream cheese: Softened cream cheese creates a much smoother filling.
- Do not overmix the eggs: Mix just until combined to avoid adding unnecessary air to the batter.
- Do not overbake: The center should still have a slight wobble when the cheesecake is finished.
- Cool it slowly: Gradual cooling helps reduce sudden temperature changes that can cause cracks.
- Chill overnight if possible: The texture becomes firmer, creamier, and easier to slice after a long chill.
- Add the cherries after chilling: This keeps the topping glossy and prevents it from sinking into the warm cheesecake.
- For cleaner slices: Wipe your knife clean between cuts for neat, bakery-style pieces.
How to Store It
Cover the cheesecake tightly with plastic wrap or place individual slices in airtight containers. Store it in the refrigerator for up to 4 to 5 days.
For longer storage, individual slices can be wrapped well and frozen for up to 2 months. Thaw them overnight in the refrigerator before serving.
This cheesecake is best served chilled, so there is no need to reheat it.
What to Serve With Cherry Cheesecake
This cheesecake is delicious on its own, but a few simple additions can make it feel even more special.
- Fresh cherries
- Whipped cream
- Fresh berries
- Vanilla ice cream
- A cup of hot coffee
- Black or herbal tea
A small spoonful of lightly sweetened whipped cream is especially good with the rich cheesecake and bright cherry topping.
Frequently Asked Questions
Can I use a store-bought graham cracker crust?
Yes. A prepared graham cracker crust can save time and works well for a smaller cheesecake. For the tall cheesecake shown in the photo, however, a 9-inch springform pan gives you the best presentation.
Why does my cheesecake crack?
Cracks can happen when the cheesecake is overbaked, cooled too quickly, or mixed too vigorously. Even if a small crack appears, the cherry topping will cover it beautifully.
How do I know when the cheesecake is done?
The edges should look set while the center still has a slight jiggle when the pan is gently moved. It will firm up considerably as it cools and chills.
Can I use homemade cherry topping?
Absolutely. Fresh or frozen cherries can be cooked with sugar and a little cornstarch to make a homemade topping. The result will have a fresher fruit flavor.
How long should cheesecake chill?
Chill the cheesecake for at least 4 hours before slicing. For the best texture and cleanest slices, refrigerating it overnight is even better.
Can I freeze cherry cheesecake?
Yes. Wrap individual slices tightly and freeze them for up to 2 months. Thaw them overnight in the refrigerator and add any extra topping just before serving.
Can I make this cheesecake ahead of time?
Yes, and it is actually an excellent make-ahead dessert. Prepare the cheesecake the day before, chill it overnight, and add the cherry topping shortly before serving.
Classic Cherry Cheesecake
Prep Time: 25 minutes
Cook Time: 65 minutes
Chill Time: 4 hours
Total Time: 5 hours 30 minutes
Servings: 10 slices
Ingredients
- 2 cups graham cracker crumbs
- 5 tablespoons unsalted butter, melted
- 2 tablespoons granulated sugar
- 24 ounces full-fat cream cheese, softened
- 1 cup granulated sugar
- 1 cup sour cream
- 3 large eggs, room temperature
- 2 teaspoons vanilla extract
- 1/4 teaspoon salt
- 1 can (21 ounces) cherry pie filling
Instructions
- Preheat the oven to 325°F. Lightly grease a 9-inch springform pan and line the bottom with parchment paper if desired.
- In a medium bowl, combine the graham cracker crumbs, 2 tablespoons sugar, and melted butter. Stir until evenly combined.
- Press the crumb mixture firmly into the bottom of the springform pan. Bake for 8 to 10 minutes, then remove and let cool slightly.
- In a large bowl, beat the softened cream cheese until completely smooth.
- Add 1 cup sugar and mix until combined. Add the sour cream, vanilla extract, and salt, then mix until smooth.
- Add the eggs one at a time, mixing on low speed just until each one is incorporated. Do not overmix.
- Pour the cheesecake filling over the prepared crust and gently smooth the top.
- Bake for 55 to 70 minutes, until the edges are set and the center still has a slight jiggle.
- Turn off the oven and leave the cheesecake inside with the door slightly open for about 30 minutes.
- Remove the cheesecake and let it cool completely at room temperature.
- Cover and refrigerate for at least 4 hours, preferably overnight.
- Once chilled, carefully remove the springform pan. Spoon the cherry pie filling evenly over the top.
- Slice with a sharp knife and serve chilled. Add whipped cream if desired.
Notes
For the smoothest cheesecake, make sure the cream cheese and eggs are at room temperature before mixing. Do not overbake the cheesecake; a slight wobble in the center is normal and will disappear as the cheesecake chills.
For the cleanest slices, chill the cheesecake overnight and wipe a warm, sharp knife clean between each cut.
Final Thoughts
This Classic Cherry Cheesecake is the kind of dessert that looks impressive without requiring complicated decorating or special techniques. The buttery graham cracker crust, creamy cheesecake center, and glossy cherry topping do all the work.
Make it a day ahead when you can, let it chill until perfectly firm, and add that generous layer of cherries just before serving. Whether it is for a holiday, birthday, or simple family dessert, a cold slice of this creamy cherry cheesecake is always a welcome treat.